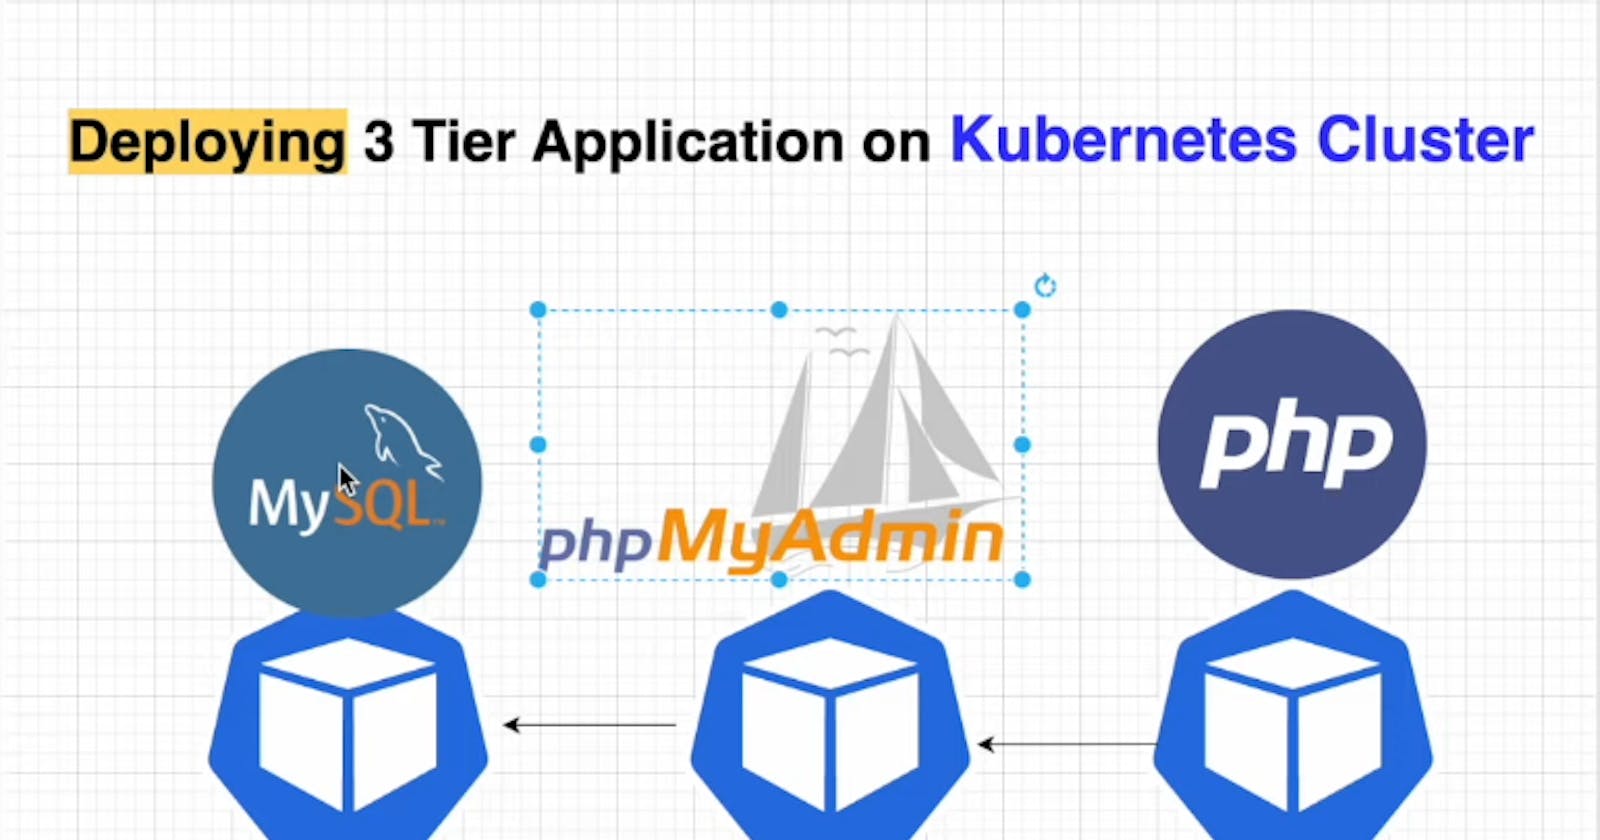


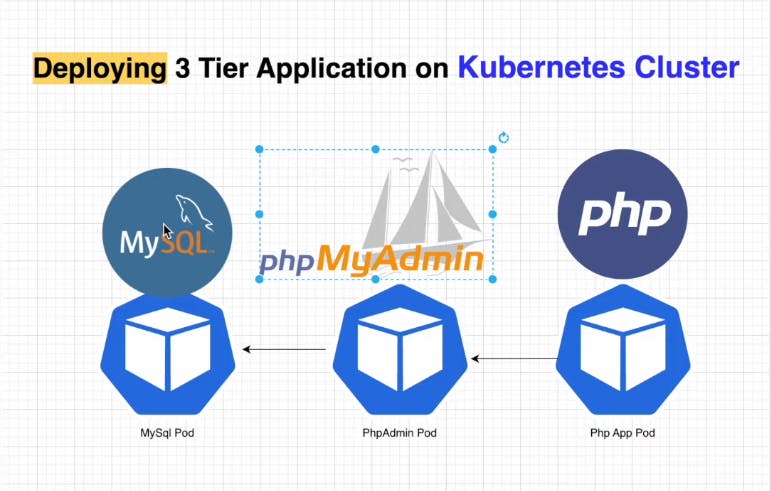
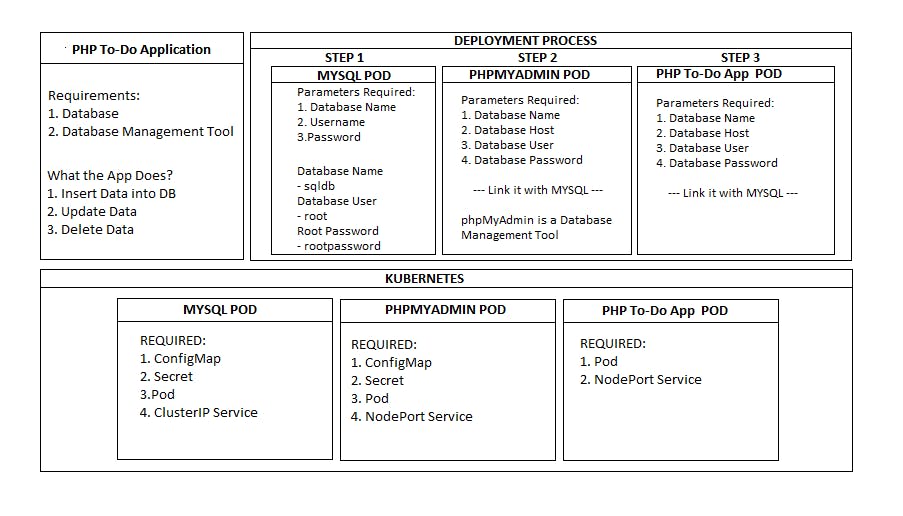
In this project we are going to deploy a sample php to-do application to Kubernetes cluster and the architecture is going to 3 tier where we are using MySql as Database and phpMyAdmin as Database Management and php for developing the application.
Prerequisites:
Git, GitHub,Docker, Kubernetes cluster, MySQL
Requirements:
What is Kubeadm?
Kubeadm is a tool built to provide kubeadm init and kubeadm join as best-practice "fast paths" for creating Kubernetes clusters.
kubeadm performs the actions necessary to get a minimum viable cluster up and running. By design, it cares only about bootstrapping, not about provisioning machines. Likewise, installing various nice-to-have addons, like the Kubernetes Dashboard, monitoring solutions, and cloud-specific addons, is not in scope.
Instead, we expect higher-level and more tailored tooling to be built on top of kubeadm, and ideally, using kubeadm as the basis of all deployments will make it easier to create conformant clusters.
Creating Kubernetes cluster using Kubeadm
Go to AWS Management Console
EC2 -> Launch Instance
Launch two EC2 instances with Ubuntu image and t2.medium instance type, one is for master and other for worker node

Installing Docker
Uninstall old versions
Older versions of Docker went by the names of docker, docker.io, or docker-engine, you might also have installations of containerd or runc. Uninstall any such older versions before attempting to install a new version:
sudo apt-get remove docker docker-engine docker.io containerd runc
apt-getmight report that you have none of these packages installed.
Install using the apt repository
Before you install Docker Engine for the first time on a new host machine, you need to set up the Docker repository. Afterward, you can install and update Docker from the repository.
Set up the repository
- Update the apt package index and install packages to allow apt to use a repository over HTTPS:
sudo apt-get update

sudo apt-get install \

  ca-certificates \

  curl \

  gnupg
- Add Docker’s official GPG key:
sudo mkdir -m 0755 -p /etc/apt/keyrings

curl -fsSL https://download.docker.com/linux/ubuntu/gpg | sudo gpg --dearmor -o /etc/apt/keyrings/docker.gpg
- Use the following command to set up the repository:
echo \

"deb [arch="$(dpkg --print-architecture)" signed-by=/etc/apt/keyrings/docker.gpg] https://download.docker.com/linux/ubuntu \

"$(. /etc/os-release && echo "$VERSION_CODENAME")" stable" | \

sudo tee /etc/apt/sources.list.d/docker.list > /dev/null
Install Docker Engine
- Update the apt package index:
sudo apt-get update
Receiving a GPG error when running apt-get update?
Your default umask may be incorrectly configured, preventing detection of the repository public key file. Try granting read permission for the Docker public key file before updating the package index:
sudo chmod a+r /etc/apt/keyrings/docker.gpg

sudo apt-get update
- Install Docker Engine, containerd, and Docker Compose.
To install the latest version, run:
sudo apt-get install docker-ce docker-ce-cli containerd.io docker-buildx-plugin docker-compose-plugin -y
- Verify that the Docker Engine installation is successful by running the hello-world image:
sudo docker run hello-world
This command downloads a test image and runs it in a container. When the container runs, it prints a confirmation message and exits.
Installing kubeadm, kubelet and kubectl
- Update the apt package index and install packages needed to use the Kubernetes apt repository:
sudo apt-get update

sudo apt-get install -y apt-transport-https ca-certificates curl
- Download the Google Cloud public signing key:
sudo curl -fsSLo /etc/apt/keyrings/kubernetes-archive-keyring.gpg https://packages.cloud.google.com/apt/doc/apt-key.gpg
- Add the Kubernetes apt repository:
echo "deb [signed-by=/etc/apt/keyrings/kubernetes-archive-keyring.gpg] https://apt.kubernetes.io/ kubernetes-xenial main" | sudo tee /etc/apt/sources.list.d/kubernetes.list
- Update apt package index, install kubelet, kubeadm and kubectl, and pin their version:
sudo apt-get update

sudo apt-get install -y kubelet kubeadm kubectl

sudo apt-mark hold kubelet kubeadm kubectl
sudo swapoff -a

vim /etc/fstab #comment the /swap.img
###Note: If we are getting Container runtime is not running error
sudo rm /etc/containerd/config.toml

sudo systemctl restart containerd

sudo reboot now
Install all the required tools on both master and workers nodes, follow the above mentioned procedure.
To initialize the control-plane node run:
kubeadm init <args>
kubeadm init first runs a series of prechecks to ensure that the machine is ready to run Kubernetes. These prechecks expose warnings and exit on errors. kubeadm init then downloads and installs the cluster control plane components. This may take several minutes. After it finishes you should see:
Your Kubernetes control-plane has initialized successfully!
To start using your cluster, you need to run the following as a regular user:
mkdir -p $HOME/.kube
sudo cp -i /etc/kubernetes/admin.conf $HOME/.kube/config
sudo chown $(id -u):$(id -g) $HOME/.kube/config
Alternatively, if you are the root user, you can run:
export KUBECONFIG=/etc/kubernetes/admin.conf
You should now deploy a Pod network to the cluster.
Run "kubectl apply -f [podnetwork].yaml" with one of the options listed at:
/docs/concepts/cluster-administration/addons/
You can now join any number of machines by running the following on each node
as root:
kubeadm join <control-plane-host>:<control-plane-port> --token <token> --discovery-token-ca-cert-hash sha256:<hash>
execute this on the master node
sudo kubeadm init --pod-network-cidr=10.244.0.0/16

kubectl get nodes

kubectl apply -f https://github.com/flannel-io/flannel/releases/latest/download/kube-flannel.yml

#once the kube-flannel pods are up then the nodes will be ready

kubectl get nodes

Now copy the join token from the master node and execute in the worker node
Example:
kubeadm join 172.31.43.2:6443 --token wl3td9.0ragjxhjwz1deo5t \
--discovery-token-ca-cert-hash sha256:c9eaf691a2700c7880b33b9ca8f0b4992a4458205906993947a146f750919492
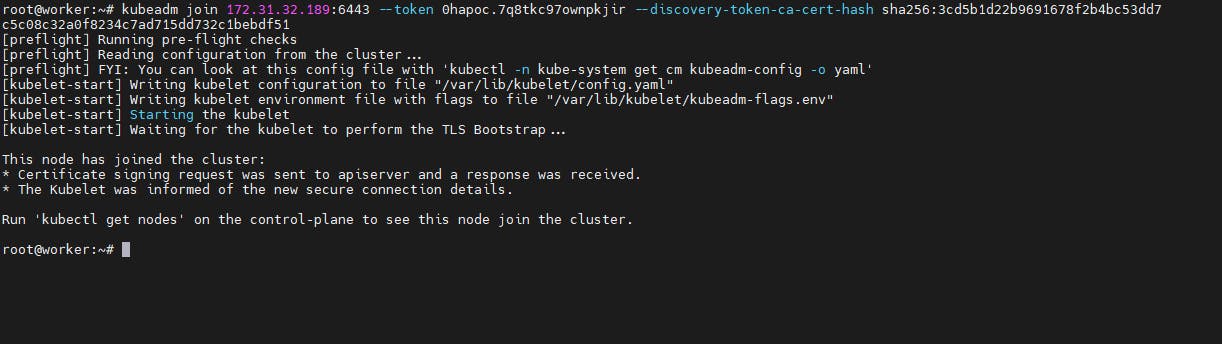
In master node kubectl get nodes
Now the Kubernetes cluster is ready
What is MySQL?
MySQL is the world's most popular open source database. With its proven performance, reliability and ease-of-use, MySQL has become the leading database choice for web-based applications, covering the entire range from personal projects and websites, via e-commerce and information services, all the way to high profile web properties including Facebook, Twitter, YouTube, Yahoo! and many more.
For more information and related downloads for MySQL Server and other MySQL products, please visit www.mysql.com
MYSQL_DATABASE This variable is optional and allows you to specify the name of a database to be created on image startup. If a user/password was supplied then that user will be granted superuser access (corresponding to GRANT ALL) to this database.
MYSQL_ROOT_PASSWORD This variable is mandatory and specifies the password that will be set for the MySQL root superuser account. In the below example, it was set to rootpassword.
Now will create a mysql pod, we require some neccesary configurations for that we create configmap for database name and secret for username and passsword
kubectl create cm db-config --from-literal=MYSQL_DATABASE=sqldb

kubectl create secret generic db-secret --from-literal=MYSQL_ROOT_PASSWORD=rootpassword
Now lets generate a yaml file to create a mysql pod
kubectl run mysql-pod --image=mysql --dry-run=client -o yaml > mysql-pod.yml
Now we have to bind the configmap and secret to mysql pod
vim mysql-pod.yml
apiVersion: v1
kind: Pod
metadata:
creationTimestamp: null
labels:
run: mysql-pod
name: mysql-pod
spec:
containers:
image: mysql
name: mysql-pod
envFrom:
configMapRef:
name: db-config
secretRef:
name: db-secret
resources: {}
dnsPolicy: ClusterFirst
restartPolicy: Always
status: {}
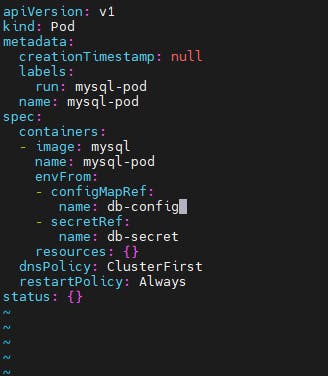
kubectl apply -f mysql-pod.yml
Now lets expose the pod using clusterIP service, so that we can connect it to phpMyAdmin
kubectl expose pod mysql-pod --port=3306 --target-port=3306 --name=mysql-svc
What is phpMyAdmin?
phpMyAdmin is a free software tool written in PHP, intended to handle the administration of MySQL over the Web. phpMyAdmin supports a wide range of operations on MySQL and MariaDB. Frequently used operations (managing databases, tables, columns, relations, indexes, users, permissions, etc) can be performed via the user interface, while you still have the ability to directly execute any SQL statement.
PMA_HOST define address/host name of the MySQL server
PMA_PORT define port of the MySQL server
PMA_USER and PMA_PASSWORD define username and password to use only with the config authentication method
Now lets create a phpMyAdmin pod, so that we can manage the MySQL Database.
kubectl get svc

kubectl create cm phpadmin-config --from-literal=PMA_HOST=<clusterip_of_mysql> --from-literal=PMA_PORT=<mysql_port>

kubectl create secret generic phpadmin-secret --from-literal=PMA_USER=root --from-literal=PMA_PASSWORD=rootpassword
Now lets generate a yaml file to create a phpMyAdmin pod
kubectl run phpadmin-pod --image=phpmyadmin --dry-run=client -o yaml > phpadmin-pod.yml
Now we have to bind the configmap and secret to phpMyAdmin pod
vim phpadmin-pod.yml
apiVersion: v1
kind: Pod
metadata:
creationTimestamp: null
labels:
run: phpadmin-pod
name: phpadmin-pod
spec:
containers:
image: phpmyadmin
name: phpadmin-pod
envFrom:
configMapRef:
name: phpadmin-config
secretRef:
name: phpadmin-secret
resources: {}
dnsPolicy: ClusterFirst
restartPolicy: Always
status: {}

kubectl apply -f phpadmin-pod.yml
Now lets expose the pod using NodePort service, so that we can access phpMyAdmin for managing MySQL Database
kubectl expose pod phpadmin-pod --type=NodePort --port=8099 --target-port=80 --name=phpadmin-svc
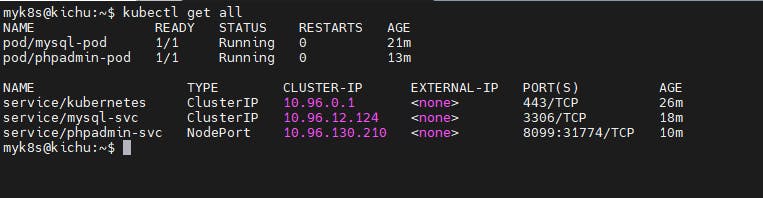
kubectl get all
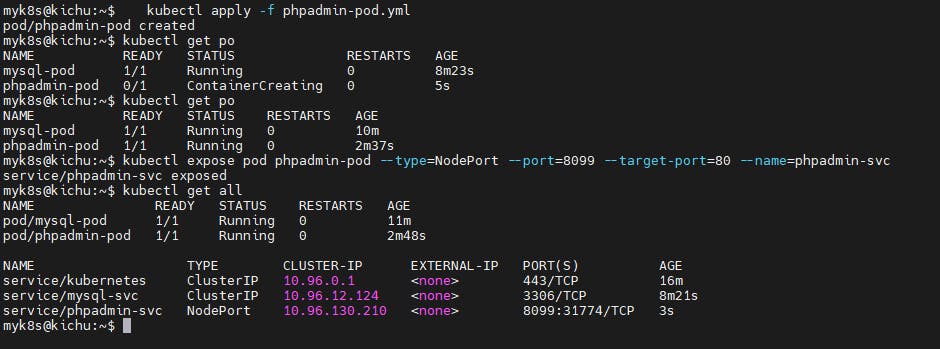
Access the phpMyAdmin UI using master node public ip and node port of phpadmin-svc
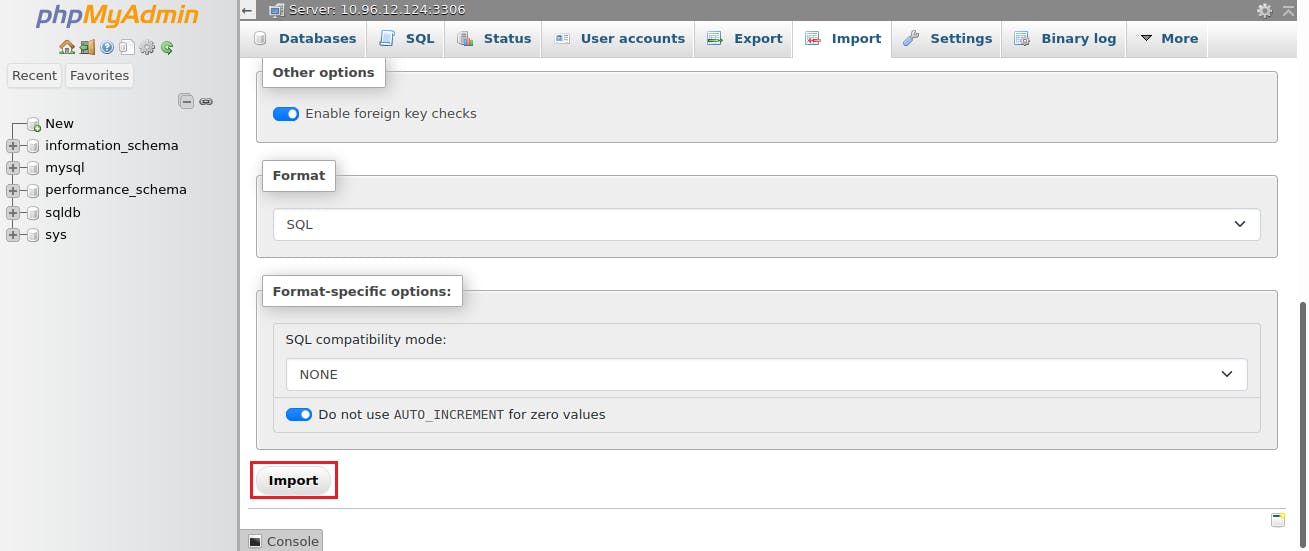
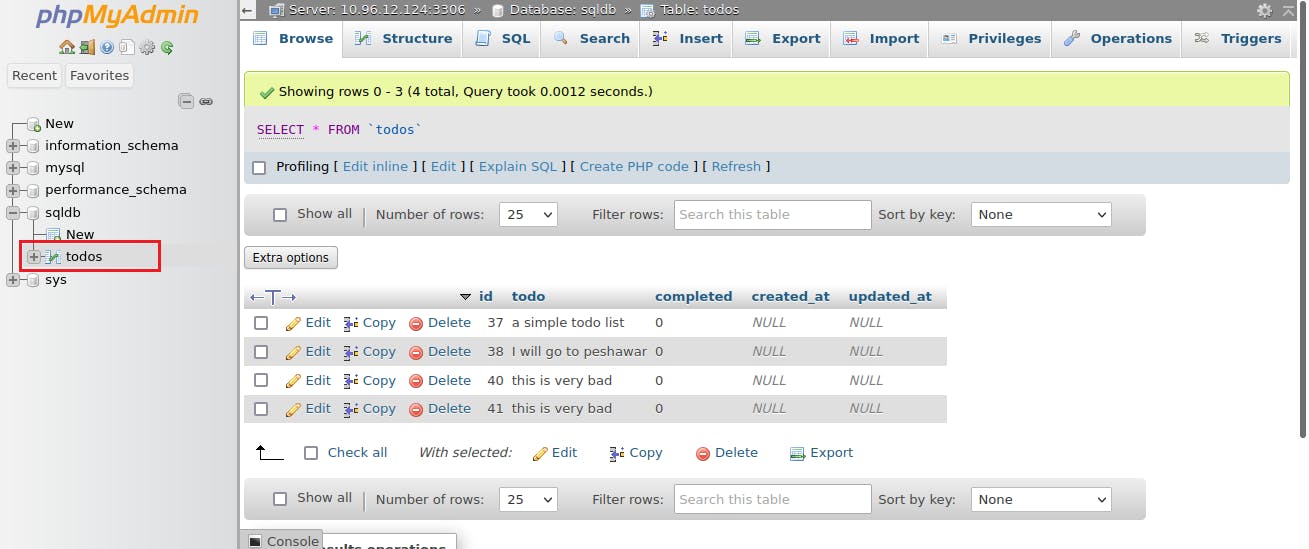
Download the simple_todo.sql file to your local system and import it to the phpMyAdmin
Select the sqldb database -> Import -> Browse -> select the simple_todo.sql file -> Import

What is PHP?
PHP is a server-side scripting language designed for web development, but which can also be used as a general-purpose programming language. PHP can be added to straight HTML or it can be used with a variety of templating engines and web frameworks. PHP code is usually processed by an interpreter, which is either implemented as a native module on the web-server or as a common gateway interface (CGI). wikipedia.org/wiki/PHP
git clone https://github.com/iamsaikishore/Project4---Deploying-a-sample-PHP-To-Do-3-Tier-Application-on-Kubernetes-Cluster.git

cd Project4---Deploying-a-sample-PHP-To-Do-3-Tier-Application-on-Kubernetes-Cluster

In the index.php file, change the localhost to 'mysql clusterip' and root user, password,mysql database name
vim index.php


Build the docker file
docker build -t iamsaikishore/phptodoapp:v1 .

Push the image to docker hub
Create a Docker Hub Account
docker login
Give the docker hub username and password, and push the image to docker hub.
docker push iamsaikishore/phptodoapp:v1
Now create the PHP Pod and expose it using the NodePort service
kubectl run php-app --image=iamsaikishore/phptodoapp:v1
kubectl expose pod php-app --type=NodePort --port=8088 --target-port=80 --name=phpapp-svc
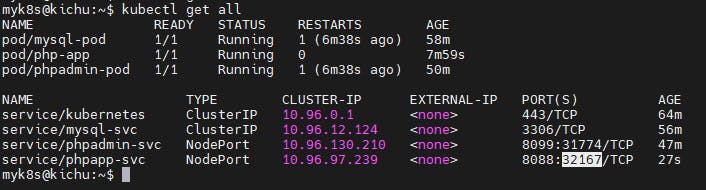
kubectl get all
To access the application public ip of master and node port of phpapp-svc
Now try to add, update, delete and mark complete the tasks and play around
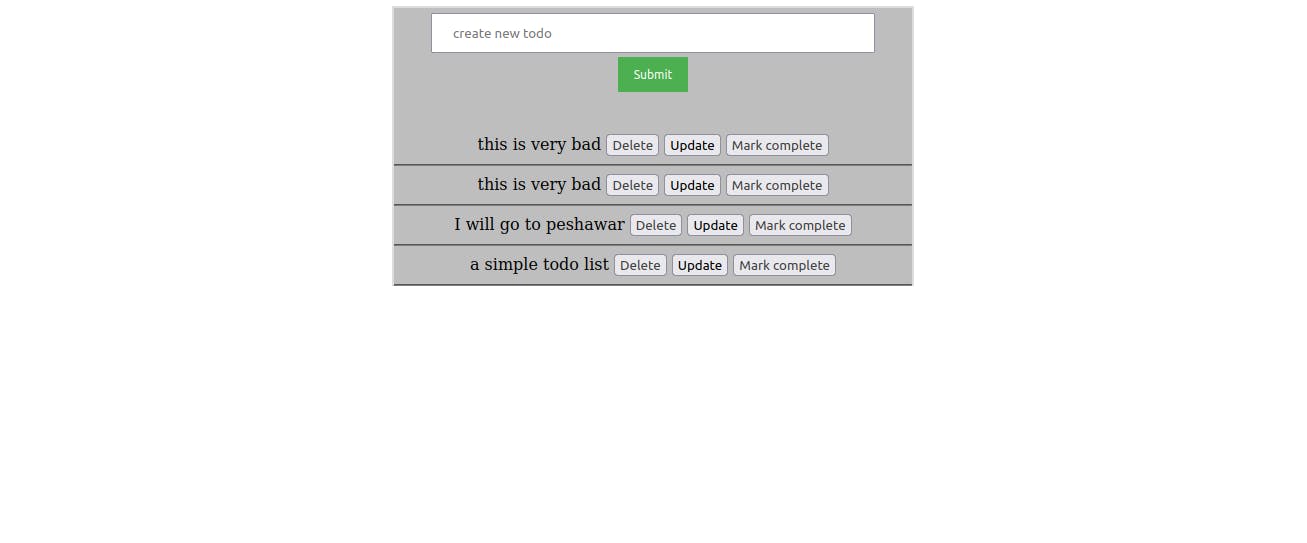


Hurrayyyyyyyyy! We have deployed the application successfully.
Hope you all are Enjoyed
For the original Project details click the below links.