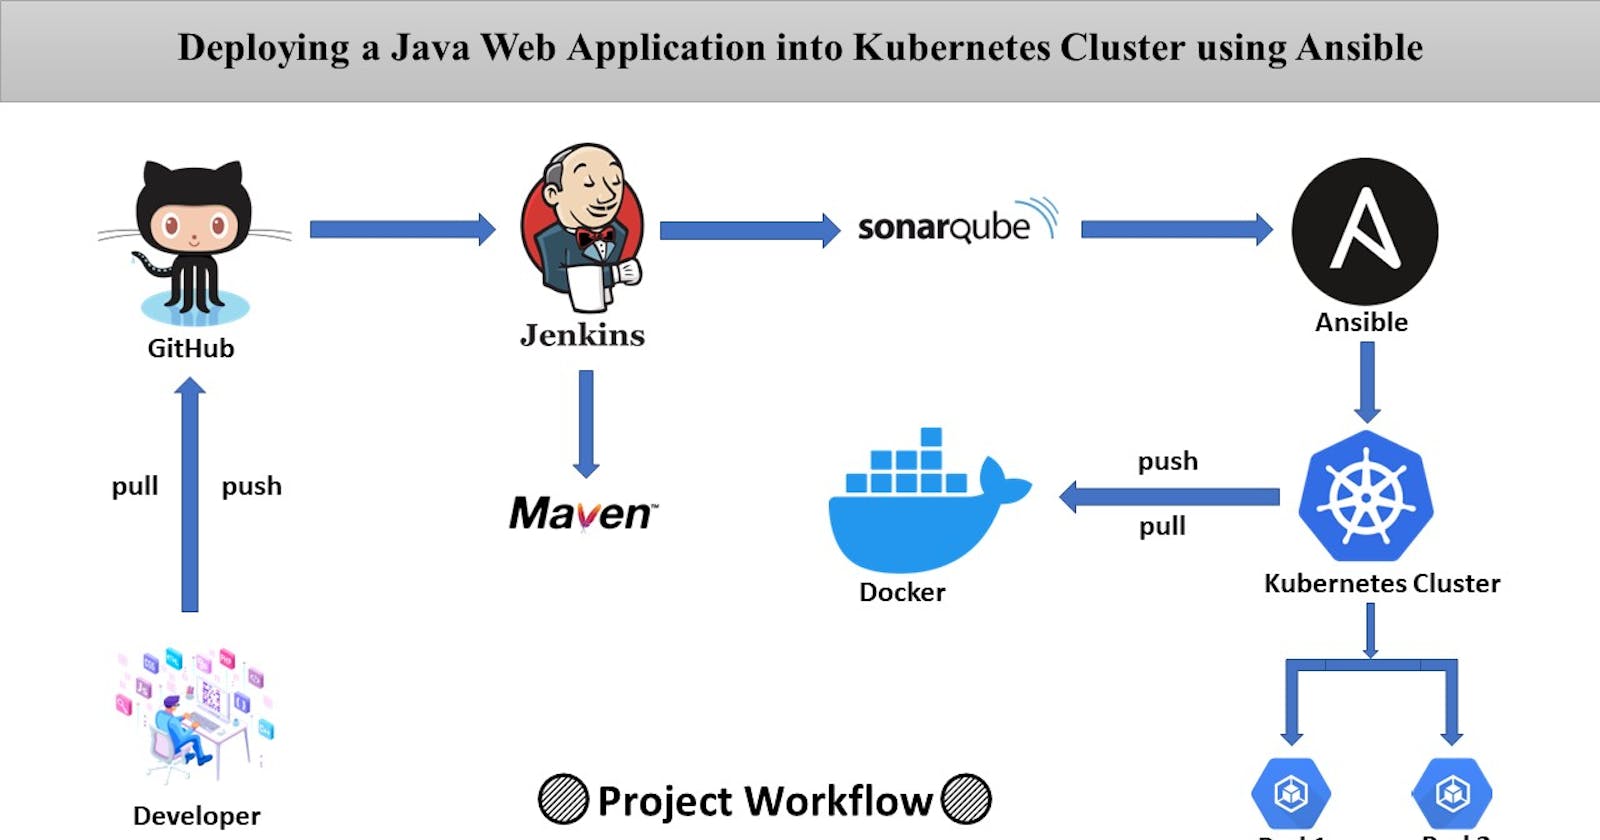
Deploying a Java Web Application into Kubernetes Cluster using Ansible.


Here is a description of the project:
This project will deploy a Java web application to Kubernetes using Ansible. The project will use the following tools:
Jenkins: Jenkins is a continuous integration and continuous delivery (CI/CD) server. It will be used to automate the build, test, and deploy of the Java web application.
Maven: Maven is a build automation tool. It will be used to build the Java web application.
Ansible: Ansible is an IT automation tool. It will be used to deploy the Java web application to Kubernetes.
Sonarqube: Sonarqube is a code quality management tool. It will be used to analyze the Java web application for quality issues.
Docker: Docker is a containerization platform. It will be used to package the Java web application into Docker containers.
Kubernetes: Kubernetes is a container orchestration platform. It will be used to deploy and manage the Docker containers.
Nginx: Nginx is a web server. It will be used as a reverse proxy for the Jenkins, Sonarqube, and Kubernetes servers.
SSL: SSL is a security protocol that encrypts data transmitted over the internet. It will be used to secure the communication between the Jenkins, Sonarqube, and Kubernetes servers and the users.
Build the Java web application using Maven, will be analyzed for quality issues using Sonarqube, will be packaged into Docker containers using Docker, Push the Docker image to a Docker registry, will be deployed to Kubernetes using Ansible, Nginx will be configured as a reverse proxy for the Jenkins, Sonarqube, and Kubernetes servers and SSL will be used to secure the communication between the servers and the users.
Once the project is complete, the Java web application will be deployed to Kubernetes and will be accessible to users via a secure connection.
Server Configurations

Configuring Server-1 (Jenkins-Ansible Server)
Launch an EC2 Instance with the following configuration
Operating System     : Ubuntu 20.04
Hostname             : jenkins-ansible
RAM                  : 4 GB
CPU                  : 2 Core
EC2 Instance         : t2.medium


Add the instance IP address to the Domain.

Now connect to your instance using Mobaxterm.
Update repository of Ubuntu
sudo -i
sudo apt-get update
Change time zone
date
timedatectl
sudo timedatectl set-timezone Asia/Kolkata
timedatectl
date
Change hostname
hostname
hostnamectl set-hostname jenkins-ansible
Installing Java:
sudo su -
apt update -y
apt-get install openjdk-11-jdk -y
java -version
Installing Jenkins:
First, add the repository key to your system:
curl -fsSL https://pkg.jenkins.io/debian-stable/jenkins.io-2023.key | sudo tee \
  /usr/share/keyrings/jenkins-keyring.asc > /dev/null
The gpg --dearmor command is used to convert the key into a format that apt recognizes.
Next, let’s append the Debian package repository address to the server’s sources.list:
echo deb [signed-by=/usr/share/keyrings/jenkins-keyring.asc] \
  https://pkg.jenkins.io/debian-stable binary/ | sudo tee \
  /etc/apt/sources.list.d/jenkins.list > /dev/null
The [signed-by=/usr/share/keyrings/jenkins.asc] portion of the line ensures that apt will verify files in the repository using the GPG key that you just downloaded.
After both commands have been entered, run apt update so that apt will use the new repository.
sudo apt-get update -y
Finally, install Jenkins and its dependencies:
sudo apt-get install jenkins -y
Now that Jenkins and its dependencies are in place, we’ll start the Jenkins server.
sudo systemctl enable jenkins.service
sudo systemctl start jenkins.service
sudo systemctl status jenkins.service
Ansible
Ansible® is an open source IT automation tool that automates provisioning, configuration management, application deployment, orchestration, and many other manual IT processes. Unlike more simplistic management tools, Ansible users (like system administrators, developers and architects) can use Ansible automation to install software, automate daily tasks, provision infrastructure, improve security and compliance, patch systems, and share automation across the entire organization.
Install Python
sudo apt update -y
sudo apt install python3 python3-pip -y
Installing Ansible:
sudo apt update -y
sudo apt install software-properties-common -y
sudo add-apt-repository --yes --update ppa:ansible/ansible
sudo apt install ansible -y
Installing Maven:
cd /opt/
ls
wget https://dlcdn.apache.org/maven/maven-3/3.9.1/binaries/apache-maven-3.9.1-bin.zip
apt-get install unzip -y
unzip apache-maven-3.9.1-bin.zip
ls
rm -rf apache-maven-3.9.1-bin.zip
ls
Configure maven home path
vim ~/.bashrc

## Add end of the file & save it.
export M2_HOME=/opt/apache-maven-3.9.1
export PATH=$PATH:$M2_HOME/bin

source ~/.bashrc
Check version
mvn --version
mvn --help
Installing Nginx:
apt update -y
apt install nginx -y
systemctl start nginx
systemctl enable nginx
systemctl status nginx
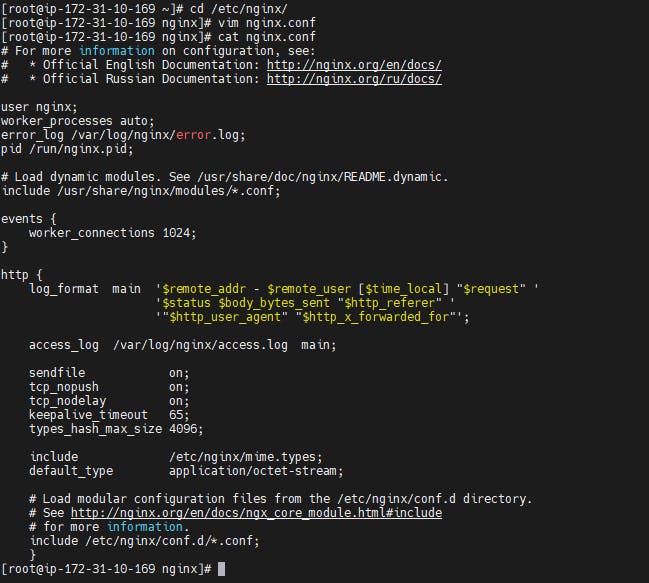
Navigate to nginx configuration directory and delete the server details from the nginx.conf file. The edited nginx.conf file should look like the below image.
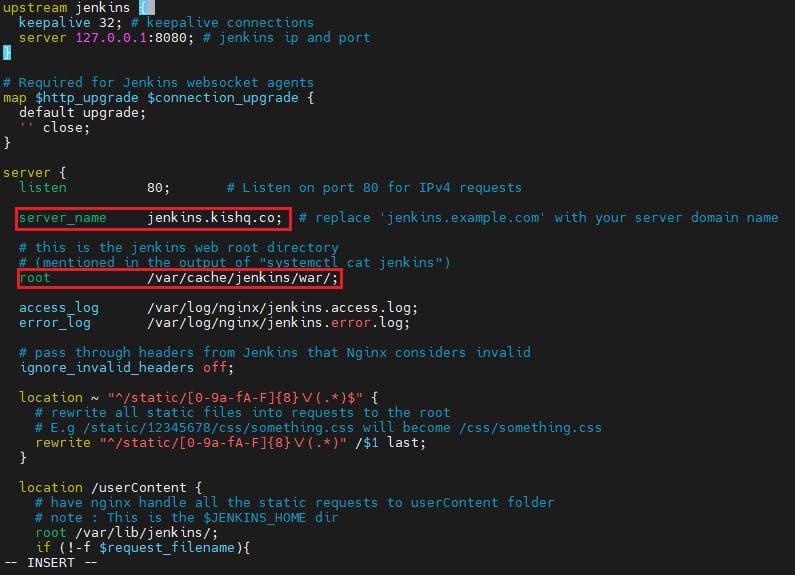
Now navigate to /etc/nginx/conf.d and create jenkins.conf file and copy the below content, edit the configuration and save the jenkins.conf file.
upstream jenkins {
  keepalive 32; # keepalive connections
  server 127.0.0.1:8080; # jenkins ip and port
}

# Required for Jenkins websocket agents
map $http_upgrade $connection_upgrade {
  default upgrade;
  '' close;
}

server {
  listen          80;       # Listen on port 80 for IPv4 requests

  server_name     jenkins.example.com;  # replace 'jenkins.example.com' with your server domain name

  # this is the jenkins web root directory
  # (mentioned in the output of "systemctl cat jenkins")
  root            /var/run/jenkins/war/;

  access_log      /var/log/nginx/jenkins.access.log;
  error_log       /var/log/nginx/jenkins.error.log;

  # pass through headers from Jenkins that Nginx considers invalid
  ignore_invalid_headers off;

  location ~ "^/static/[0-9a-fA-F]{8}\/(.*)$" {
    # rewrite all static files into requests to the root
    # E.g /static/12345678/css/something.css will become /css/something.css
    rewrite "^/static/[0-9a-fA-F]{8}\/(.*)" /$1 last;
  }

  location /userContent {
    # have nginx handle all the static requests to userContent folder
    # note : This is the $JENKINS_HOME dir
    root /var/lib/jenkins/;
    if (!-f $request_filename){
      # this file does not exist, might be a directory or a /**view** url
      rewrite (.*) /$1 last;
      break;
    }
    sendfile on;
  }

  location / {
      sendfile off;
      proxy_pass         http://jenkins;
      proxy_redirect     default;
      proxy_http_version 1.1;

      # Required for Jenkins websocket agents
      proxy_set_header   Connection        $connection_upgrade;
      proxy_set_header   Upgrade           $http_upgrade;

      proxy_set_header   Host              $http_host;
      proxy_set_header   X-Real-IP         $remote_addr;
      proxy_set_header   X-Forwarded-For   $proxy_add_x_forwarded_for;
      proxy_set_header   X-Forwarded-Proto $scheme;
      proxy_max_temp_file_size 0;

      #this is the maximum upload size
      client_max_body_size       10m;
      client_body_buffer_size    128k;

      proxy_connect_timeout      90;
      proxy_send_timeout         90;
      proxy_read_timeout         90;
      proxy_buffering            off;
      proxy_request_buffering    off; # Required for HTTP CLI commands
      proxy_set_header Connection ""; # Clear for keepalive
  }

}
- Change
server_name jenkins.example.com;toserver_name jenkins.kishq.co
where 'kishq.co' is my domain
- Change
root /var/run/jenkins/war/;toroot /var/cache/jenkins/war/;
nginx -t
nginx -s reload
use nginx -T to see nginx configuration
Install Certbot:
apt update -y
apt install certbot python3-certbot-nginx -y
systemctl status certbot.timer
certbot renew --dry-run
certbot --nginx #Give email, Select Yes, Give the appropriate Domain number, Select 2 for Redirection.
Now go to any browser and search "jenkins.your_domain" e.x: "jenkins.kishq.co"

Now configure the Jenkins by giving the Admin password, installing plugins and adding a User.
Configuring Server-2 (Sonar Server)
Launch an another EC2 Instance with the following configuration
Operating System     : Ubuntu 20.04
Hostname             : sonarqube
RAM                  : 2 GB
CPU                  : 1 Core
EC2 Instance         : t2.small


Add the instance IP address to the Domain.

Now connect to your instance using Mobaxterm.
Update repository of Ubuntu
sudo -i
sudo apt-get update
Change time zone
date
timedatectl
sudo timedatectl set-timezone Asia/Kolkata
timedatectl
date
Change hostname
hostname
hostnamectl set-hostname sonarqube
Installing Java:
sudo su -
apt update -y
apt-get install openjdk-17-jdk -y       ## For sonarqube-10.0.0.68432.zip
apt-get install openjdk-11-jdk -y       ## For sonarqube-8.9.2.46101.zip
java -version
Installing SonarQube:
cd /opt/
wget https://binaries.sonarsource.com/Distribution/sonarqube/sonarqube-10.0.0.68432.zip
OR
wget https://binaries.sonarsource.com/Distribution/sonarqube/sonarqube-8.9.2.46101.zip
apt install unzip -y
unzip sonarqube-10.0.0.68432.zip
ls
rm -rf sonarqube-10.0.0.68432.zip
mv sonarqube-10.0.0.68432 sonarqube
ls
Create sonar user
useradd -d /opt/sonarqube sonar
cat /etc/passwd | grep sonar
ls -ld /opt/sonarqube
chown -R sonar:sonar /opt/sonarqube
ls -ld /opt/sonarqube
Create custom service for sonar
cat >> /etc/systemd/system/sonarqube.service <<EOL
[Unit]
Description=SonarQube service
After=syslog.target network.target

[Service]
Type=forking
User=sonar
Group=sonar
PermissionsStartOnly=true
ExecStart=/opt/sonarqube/bin/linux-x86-64/sonar.sh start
ExecStop=/opt/sonarqube/bin/linux-x86-64/sonar.sh stop
StandardOutput=syslog
LimitNOFILE=65536
LimitNPROC=4096
TimeoutStartSec=5
Restart=always

[Install]
WantedBy=multi-user.target
EOL


ls -l /etc/systemd/system/sonarqube.service
Service start
systemctl start sonarqube.service
Service enable & check status
systemctl enable sonarqube.service
systemctl status sonarqube.service
Check 9000 port is used or not
apt install net-tools
netstat -plant | grep 9000
Install Python
sudo apt update -y
sudo apt install python3 python3-pip -y
apt update -y
apt install nginx -y
systemctl start nginx
systemctl enable nginx
systemctl status nginx
vim /etc/nginx/conf.d/sonar.conf

# the server directive is Nginx's virtual host directive
server {
  # port to listen on. Can also be set to an IP:PORT
  listen 80;
  # sets the domain[s] that this vhost server requests for
  server_name sonar.kishq.co;
  location / {
    proxy_pass http://127.0.0.1:9000;
  }
}
nginx -t
nginx -s reload
use nginx -T to see nginx configuration
Install Certbot:
apt update -y
apt install certbot python3-certbot-nginx -y
systemctl status certbot.timer
certbot renew --dry-run
certbot --nginx #Give email, Select Yes, Give the appropriate Domain number, Select 2 for Redirection.
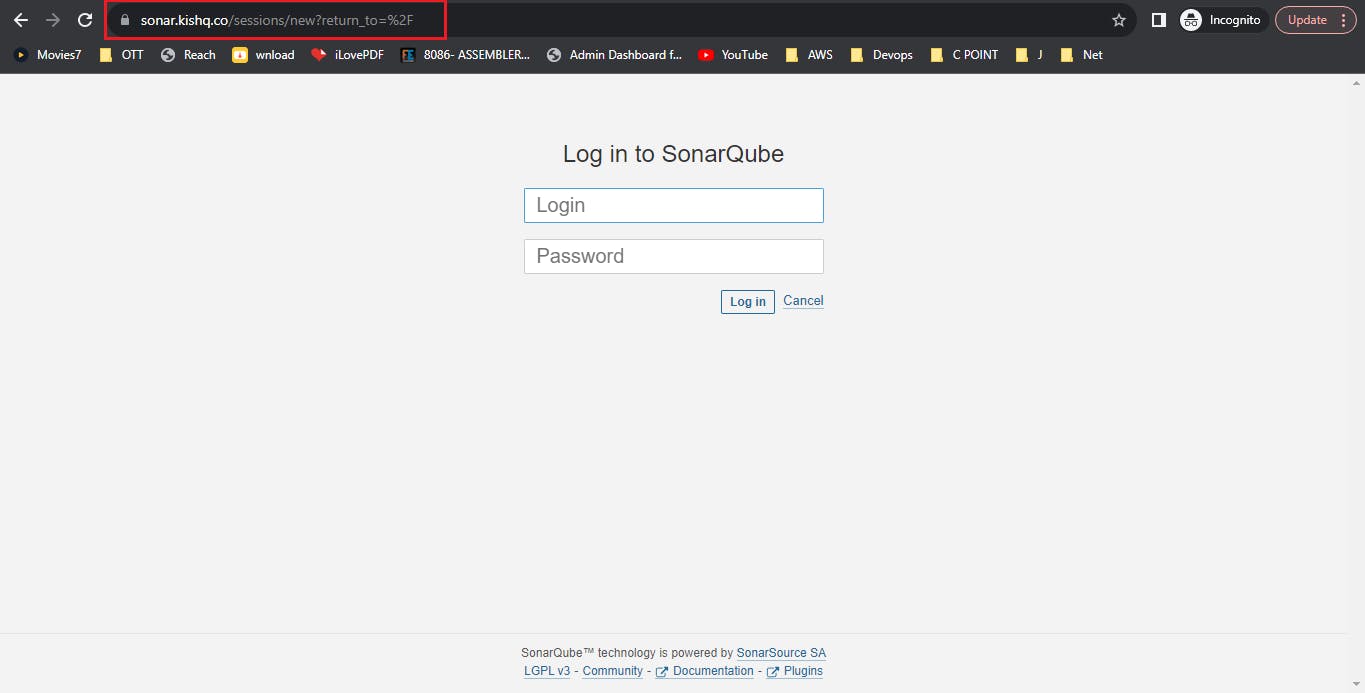
Open sonarqube on browser
URL:   https://sonar.kishq.co

U: admin
P: admin

New Pass: admin@123
Configuring Server-3 (Kubernetes Cluster)
Launch an another EC2 Instance with the following configuration
Operating System     : Ubuntu 20.04
Hostname             : kubernetes
RAM                  : 4 GB
CPU                  : 2 Core
EC2 Instance         : t2.medium


Add the instance IP address to the Domain.

Now connect to your instance using Mobaxterm.
Update repository of Ubuntu
sudo su -
sudo apt-get update
Change time zone
date
timedatectl
sudo timedatectl set-timezone Asia/Kolkata
timedatectl
date
Change hostname
hostname
hostnamectl set-hostname kubernetes
Start by disabling the swap memory
sudo swapoff -a
sed -i 's/^\(.*swap.*\)$/#\1/' /etc/fstab
Install Docker with the command
sudo apt-get install -y \
    apt-transport-https \
    ca-certificates \
    curl \
    gnupg-agent \
    software-properties-common
Add Docker’s official GPG key
curl -fsSL https://download.docker.com/linux/ubuntu/gpg | sudo apt-key add -
Add Docker Repo
sudo add-apt-repository \
   "deb [arch=amd64] https://download.docker.com/linux/ubuntu \
   $(lsb_release -cs) \
   stable"
Install the latest version of Docker Engine and containerd
sudo apt-get install -y docker-ce docker-ce-cli containerd.io
Check the installation (and version) by entering the following
docker --version
The product_uuid can be checked by using the command
sudo cat /sys/class/dmi/id/product_uuid
Set Docker to launch at boot by entering the following
sudo systemctl enable docker
Verify Docker is running
sudo systemctl status docker
Add Kubernetes Repo
{
  curl -s https://packages.cloud.google.com/apt/doc/apt-key.gpg | apt-key add -
  echo "deb https://apt.kubernetes.io/ kubernetes-xenial main" > /etc/apt/sources.list.d/kubernetes.list
}
Install kubeadm kubelet kubectl
apt update && apt-get install -y kubelet=1.21* kubeadm=1.21* kubectl=1.21*                 ## For 1.21 version
sudo apt-mark hold kubelet kubeadm kubectl
Verify the installation with kubeadm
kubeadm version
kubectl version --short
Initialize Kubernetes on Master Node
sudo kubeadm init --pod-network-cidr=10.244.0.0/16
Enter the following to create a directory for the cluster: To start using your cluster, you need to run the following as a regular user
sudo mkdir -p $HOME/.kube
sudo cp -i /etc/kubernetes/admin.conf $HOME/.kube/config
sudo chown $(id -u):$(id -g) $HOME/.kube/config
Now check to see if the kubectl command is activated
kubectl get nodes

NAME          STATUS   ROLES    AGE    VERSION
master-node   NOtReady    master   8m3s   v1.18.5
Deploy Pod Network to Cluster
sudo kubectl apply -f https://raw.githubusercontent.com/coreos/flannel/master/Documentation/kube-flannel.yml
Verify that everything is running and communicating
kubectl get pod --all-namespaces
Cross check your cluster is running status
kubectl get nodes
Remove taint from k8-master node
kubectl taint nodes kubernetes node-role.kubernetes.io/control-plane:NoSchedule-            ## v1.27.1
OR
kubectl taint nodes kubernetes node-role.kubernetes.io/master:NoSchedule-                   ## v1.21.14
KUBERNETES CLUSTER TESTING
Check pod status
kubectl get pod
Create testing.yml and insert below content
vim testing.yaml
apiVersion: v1
kind: Pod
metadata:
  name: testing
spec:
  containers:
  - name: testing
    image: nginx
Check pod status
kubectl apply -f testing.yaml
Check pod status
kubectl get pod
After check delete the pod
kubectl delete -f testing.yaml
Install Python
sudo apt update -y
sudo apt install python3 python3-pip -y
apt update -y
apt install nginx -y
systemctl start nginx
systemctl enable nginx
systemctl status nginx
vim /etc/nginx/conf.d/k8s.conf

# the server directive is Nginx's virtual host directive
server {
  # port to listen on. Can also be set to an IP:PORT
  listen 80;
  # sets the domain[s] that this vhost server requests for
  server_name k8s.kishq.co;
  location / {
    proxy_pass http://127.0.0.1:30000;
  }
}
nginx -t
nginx -s reload
use nginx -T to see nginx configuration
Install Certbot:
apt update -y
apt install certbot python3-certbot-nginx -y
systemctl status certbot.timer
certbot renew --dry-run
certbot --nginx #Give email, Select Yes, Give the appropriate Domain number, Select 2 for Redirection.
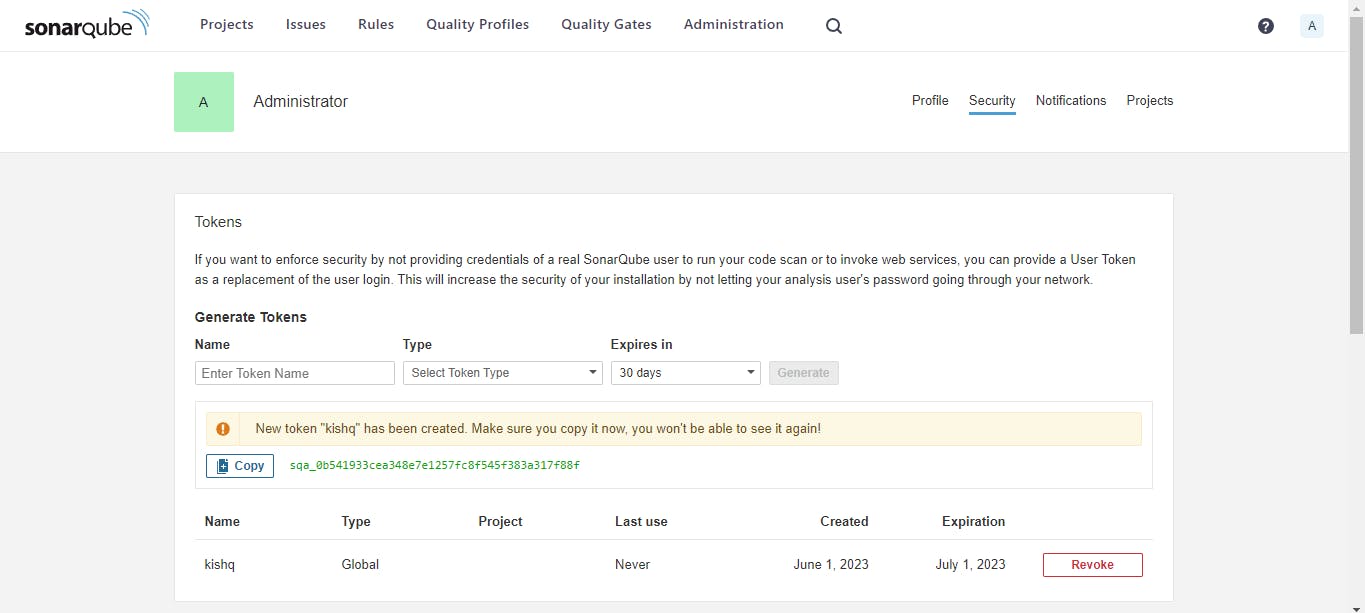
Jenkins integration with Sonarqube server.
Login Sonarqube server
Sonarqube > My Account > Security > Generate Tokens
                      Name    : kishq
                      Type    : Global Analysis Token
                      Expires : 30 Days
Generate

After that copy token & save it.


Go to Jenkins and create credential for Sonar token
Dashboard > Manage Jenkins > Credentials > System Global credentials (unrestricted) > Add credentials >
                                                                                            kind: Secret text
                                                                                            Scope: Global
                                                                                            Secret: ******
                                                                                            ID: SONAR_TOKEN
                                                                                            Des: SONAR_TOKEN
Create
Jenkins integration with DockerHub.
create credentials for DockerHub server login
Dashboard > Manage Jenkins > Credentials > System Global credentials (unrestricted) > Add credentials >
                                                                                            kind: Secret text
                                                                                            Scope: Global
                                                                                            Secret: ****** #give dockerhub username
                                                                                            ID: DOCKERHUB_USER
                                                                                            Des: DOCKERHUB_USER
Create

##################################

Dashboard > Manage Jenkins > Credentials > System Global credentials (unrestricted) > Add credentials >
                                                                                            kind: Secret text
                                                                                            Scope: Global
                                                                                            Secret: ****** #give dockerhub password
                                                                                            ID: DOCKERHUB_PASS
                                                                                            Des: DOCKERHUB_PASS
Create
Configure inventory file & Passwordless authentication with Kubernetes server.
+++++++++++++++ KUBERNETES SERVER ++++++++++++++++++++++
passwd root
cp -r /etc/ssh/sshd_config /etc/ssh/sshd_config_orig
sed -i "s/#PermitRootLogin prohibit-password/PermitRootLogin yes/g" /etc/ssh/sshd_config
sed -i "s/PasswordAuthentication no/PasswordAuthentication yes/g" /etc/ssh/sshd_config
systemctl restart sshd.service
+++++++++++++++ JENKINS-ANSIBLE SERVER ++++++++++++++++++++++
cat /etc/ansible/hosts
> /etc/ansible/hosts
cat /etc/ansible/hosts
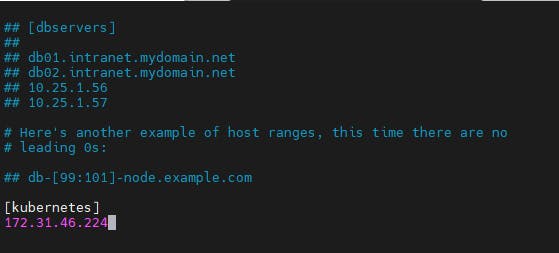
vim /etc/ansible/hosts
[kubernetes]
<kubernetes_ip>
cat /etc/ansible/hosts
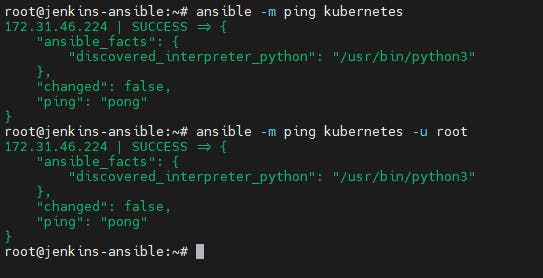
su - jenkins
ansible -m ping kubernetes -u root
ssh root@<kubernetes_ip>
ssh-keygen
ssh-copy-id root@<kubernetes_ip>
ssh root@<kubernetes_ip>
ansible -m ping kubernetes -u root

Configure jenkins pipeline job.
Login Jenkins > New Item > project-1 > Pipeline > OK

    Pipeline:        Definition: Pipeline script from SCM

    SCM:             Git

    Repositories:    Repository URL: https://github.com/iamsaikishore/Project7---Deploying-a-Java-Web-Application-into-Kubernetes-Cluster-using-Ansible.git

    Script Path:     Jenkinsfile
Now run the Jenkins Pipeline by clicking 'Build Now'.
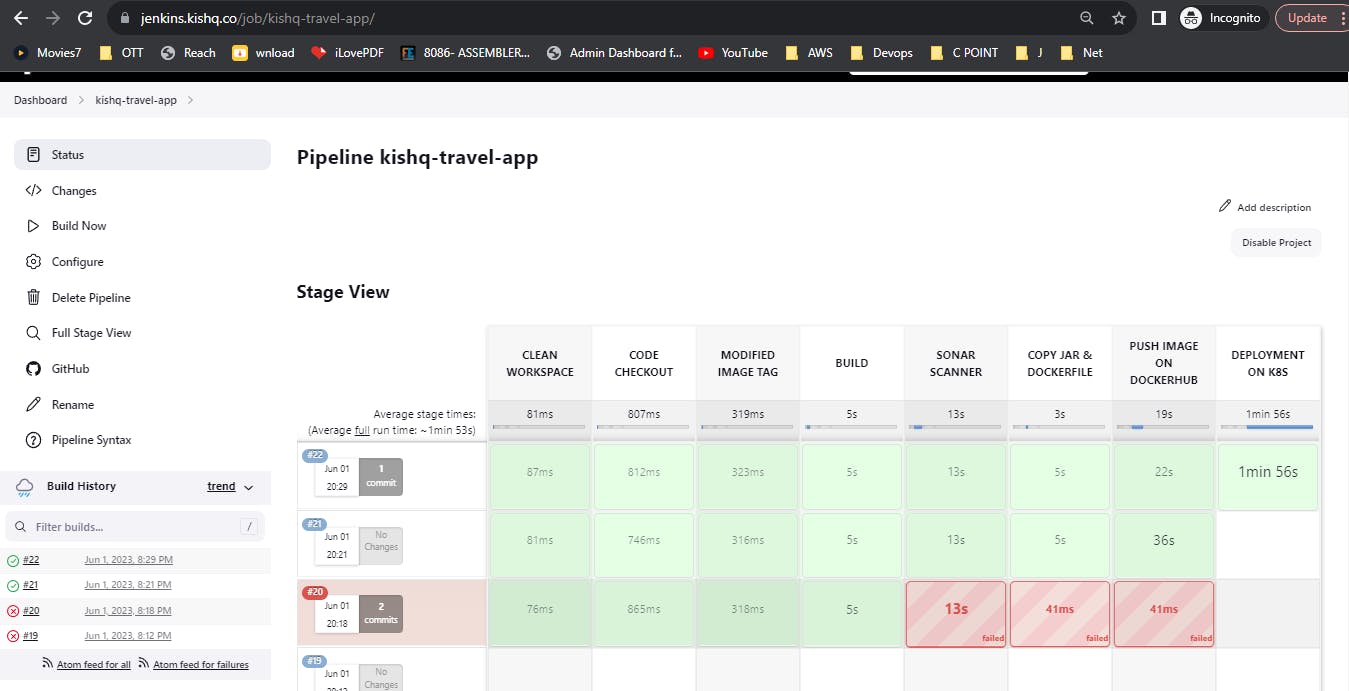
Try to run the Jenkins Pipeline by Stages.
SonarQube Results:

Run 'kubectl get po,svc' on Kubernetes cluster


Thanks for your time. We have deployed the Application successfully.